Localize your Android App with multiple language options
May 16, 2021 by Atul Sharma


Android runs on many devices in many regions. To reach the most users, your app should handle text, audio files, numbers, currency, and graphics in ways appropriate to the locales where your app is used.
It is not enough to use only one language option while developing applications. When we publish our applications, there may be users who want to use it in different languages or who do not know the language we have developed. Therefore, the fact that our application supports multiple languages makes it always more useful.
Whenever the app runs in a locale for which you have not provided locale-specific text, Android loads the default strings from res/values/strings.xml.
Let’s learn how to add multi-language support to your app:
Step 1
Extract all the strings from your activity’s java and xml file to res/values/strings.xml.

Step 2
After extraction open the file and you will see the open editor on right side of studio. Open it.

Step 3
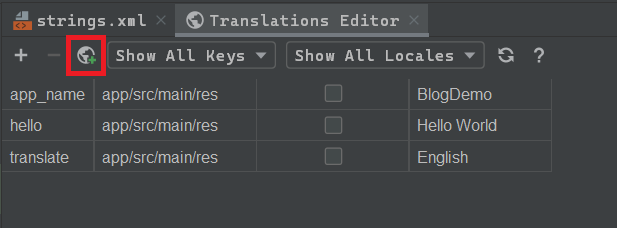
When your translations editor is opened select the add locale button.(Red Square).

Step 4
Select as many language you want to add from the list.

Step 5
Add your translated text in green box and if you want to have some text a single equivalent in each language enable the Untranslatable option in red. For example, you can choose your app’s name to be the same in all languages.

Done. We have translated our app’s strings file.
Now that our strings file is ready how to switch languages from within the app programmatically?
It’s simple!
Just add this code in your activity where you want to call to make changes.
public void setLocale(Activity activity, String languageCode) {
        Locale locale = new Locale(languageCode);
        Locale.setDefault(locale);
        Resources resources = activity.getResources();
        Configuration config = resources.getConfiguration();
        config.setLocale(locale);
        resources.updateConfiguration(config, resources.getDisplayMetrics());
    }
Put this method in your Application class to call it from any activity.
Now how to set a particular language by calling the above code.
myApp.setLocale(MainActivity.this,"hi");
// or
myApp.setLocale(MainActivity.this,"en");
// here 'hi' stands for Hindi and 'en' for English
Wait!! There is still one thing missing.
When you change the language within the activity that activity’s language doesn’t change as changes take place in onCreate() method. So what to do?
You should recreate the activity along with when you set the app’s language i.e. restarting the activity without any visible transitions, like if nothing happened. So what’s the perfect method to do so?
startActivity(getIntent());
finish();
overridePendingTransition(0, 0);
Calling this method sends the intent to the same activity with minimal or no delay and faster transitions with multiple languages.
And Don’t forget to save the user’s language choice to device so when app starts again it loads the user’s selected language.
For more help or info refer this Google Doc by Android.
Hope it helped. Happy Coding 😀
